5 min read
This guide will help you to get an understanding of how you use the various features in the
WordPress dashboard to keep your site or blog updated. If you’re looking for more in-depth
knowledge, there are additional articles in the WordPress codex that go into more detail.
Before you can make any changes to your site you will need to log in. The login for your site can always be found at the followingnd
e.g. if your domain is https://business.com your WordPress login will be https://business.com/wp-admin
You can login to your Dashboard using your email address and password that would have been provided for you by your website administrator.
If a staging site was setup for your website, the staging site can be found at:
https://staging.business.com
You can login to your Dashboard using your email address associated with your account.
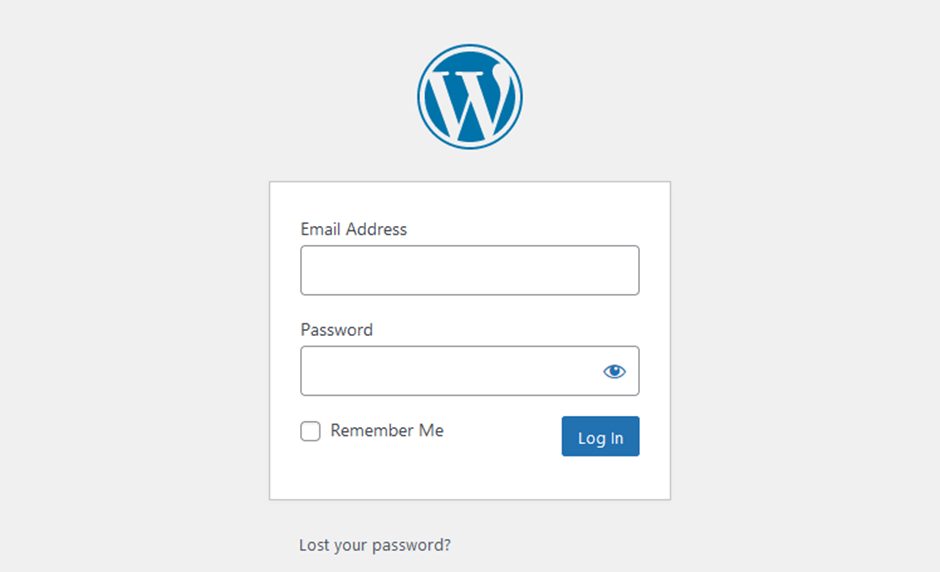
You can click on the ‘eye’ icon n the Password field to reveal the password that you entered, if you’d like to make sure you typed it correctly.
If you have lost your password or just can’t remember it, click the Lost your password? link. You will be prompt to enter your username or email address and after clicking the Get New Password button, you’ll receive an email with instructions on how to reset your password.
Once you have logged in, the WordPress Dashboard appears. This is your main administration homepage. At the very top of your Dashboard (and across every page) you will see the name of your site in the header area. In the example screenshot below (and throughout this documentation) the site name is Your WordPress Site. This is also hyperlinked to your site’s homepage. You will also see the name of the person who is currently logged in (e.g., Joe Smith). Move your cursor over your name to reveal the Log Out link as well as a link to edit your Profile.
When new or updated features are introduced into WordPress, you will be shown a New Feature Pointer. This is simply to bring to your attention some feature within the Dashboard that has been added or updated. In the following Dashboard image, the New Feature Pointer is highlighting the updated Toolbar. Click Dismiss to hide the pointers.
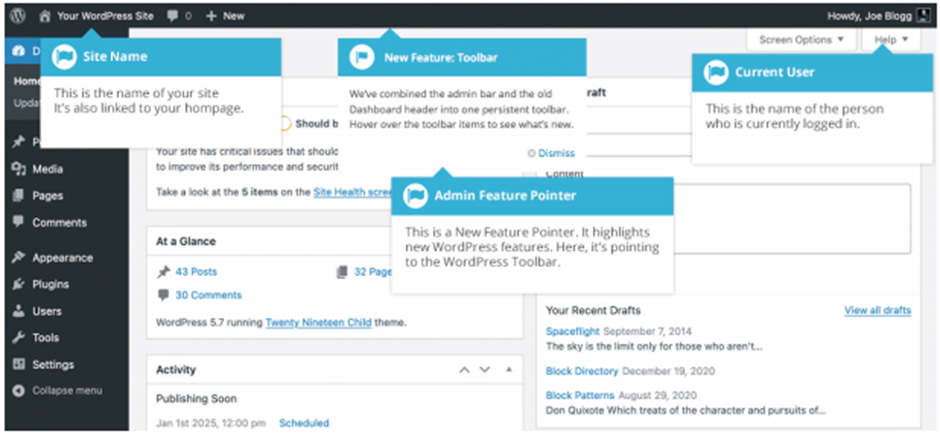
On most pages, just below your Username there are a couple of small, inverted tabs. One called Screen Options, and another called Help. Clicking either of these links will cause a panel to slide down from the top of the page. The Help link, not surprisingly, displays some help information. The Screen Options link will display various options that allow you to configure what is displayed on the current page.
The details in this panel change depending on what page you are currently viewing. As an example, on your main Dashboard page the Screen Options allow you to set which panels you would like displayed on the page.
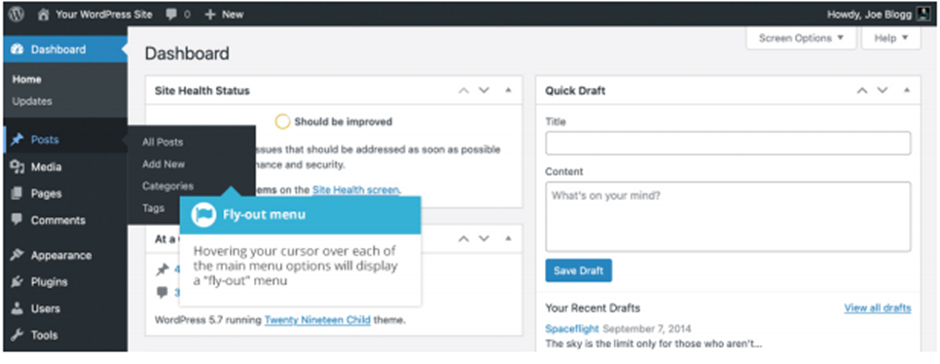
Down the left-hand side of the Dashboard and on every page, you will see your main navigation menu. This is where you will find all the options to update and configure your site. Hovering your cursor over each of the main menu options will display a ‘fly-out’ menu with the various choices for that particular menu option. Once you click each of the main menu options, that particular menu will expand to show all the available options within that section (if there are any)
The main menu options and their usage are:
Dashboard This will display your main Dashboard ‘homepage’. In the top left of your Dashboard, you’ll see some brief stats on the number of Posts, Pages and Comments
Posts
This is where you can create a new Blog Post. You can also update your Categories and Post Tags.
Media
This is where all your uploaded images, documents or files are stored. You can browse through your Media library, as well as edit and update the files.
Pages
This is where you create and maintain all your Pages.
Comments You can manage all your Comments within this section, including replying to comments or marking them as spam.
Appearance
This menu is where you control how your site looks. You can choose a new Theme, manage your site Widgets or Menus and even edit your site theme files.
Plugins extend and expand the functionality of WordPress. You can add or delete plugins within here as well as activate or deactivate them (Recommended for advanced users only).
Users
This screen lists all the existing users for your site. Depending on your Role, you can also add new users as well as manage their Roles.
Tools
This section gives you access to various convenient tools such as options to import and export data to/from your WordPress site.
You can also run a Site Health check, which shows critical information about your WordPress configuration and any items that may require your attention.
Settings
This is where most of your site is configured. Among other things, it allows you to configure your site name and URL
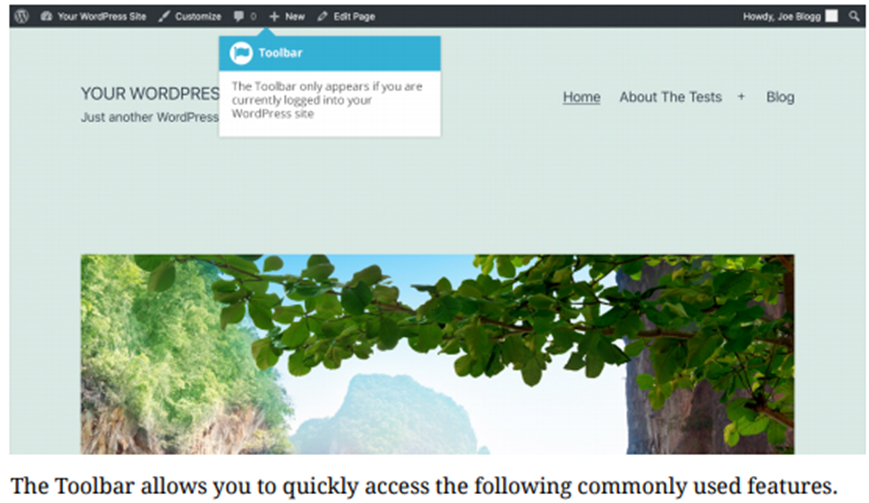
Toolbar
The WordPress Toolbar is a way of easily accessing some of the most common WordPress features. When you are logged into your WordPress dashboard and you visit your website, you will see the Toolbar running across the top of your site. This bar only appears if you are currently logged into your WordPress site, which means that it won’t be visible to your everyday site visitors. If you are not logged in, the Toolbar won’t be displayed.
Powered by BetterDocs